I’m going to keep this short and sweet because I am busy making banana bread muffins…not because I am feeling especially hungry for banana bread muffins or because I love my children dearly and want them to have homemade baked goods. Nope, we just had a bunch of bananas about to go bad and I felt guilty wasting them. (Bonus, my kids do love banana bread muffins and will swear I am the best mom ever in the morning).
My kids are all back in school and I like to do a little “Welcome Back” gift for all their teachers. Truly it’s a “I’m-sorry-you-get-paid-crap-but-I-am-thankful-that-you-do-this-important-work-please-know-I-appreciate-you” gift. But that’s generally too long so I call it a welcome back basket. This is totally something you should pin but not because it’s perfect or impressive – but more because it’s totally easy and always a big hit. 🙂 Behold, the Back-to-School Basket…

Welcome Back Basket!
Yep, that’s it. A big dollar store bin filled with easy to eat snacks. Let me tell you, as a former teacher and daughter of a teacher, I know just how much work these teachers do and how they come in early and stay late and will absolutely forget to eat. Or miss lunch entirely because they are busy making copies and filling out paperwork and changing up a lesson plan to accommodate for a student. This gives them some quick, easy-to-eat snacks that they can grab whenever. Plus, of course, tons of chocolate (it’s hard to see as it usually falls to the bottom) because, chocolate.
The best part about this is that it does not require any craftiness and the kids can absolutely help. In fact, they can mostly do it. First I find a container of some sort, usually at a dollar store, that can be used again in the classroom. In this case, my son’s school colors are purple and yellow and so he picked purple for his teacher (my other kiddos picked purple and green). We actually don’t do a lot of processed foods, although we do keep cereal and granola bars on hand, so they had a lot of fun picking out things for their

helping to fill the bins!
teachers. We tried to stick to things that weren’t terribly unhealthy. Ultimately, you can add whatever you want but I try to do both savory and sweet, breakfast snacks and afternoon snacks, small chocolates, some protein (nuts or granola bars), gum, microwave popcorn, and fun drinks. The kids are able to fill it mostly themselves (littles need a little help) and I have them draw a picture. I usually write a simple note, something along the lines of “Here are some treats for those times when you’ve forgotten to eat or stay late. We know you work hard and appreciate all you do! Have a great year!” This year I gave these on the last day of the first week, so I started with “You’ve survived the first week!”
Even if you just do a small jar full of chocolates, I think this is a such an easy, thoughtful gift and a great way for the teachers to start the year. It’s also important to remember that you don’t have to go all out with crazy craft projects or expensive Yeti tumblers engraved with their monogram. It really is the thought that counts and I love that this lets the kids get involved as well. All my kids just beamed carrying it in to their new teachers which is so nice to see them get joy from giving to others. But, more importantly, the teachers, who by that last day were looking quite tired, were genuinely surprised and touched and that’s so important – they have a whole school year ahead of them and we want them to know, from that first week, that we will be there to support them all year. 🙂
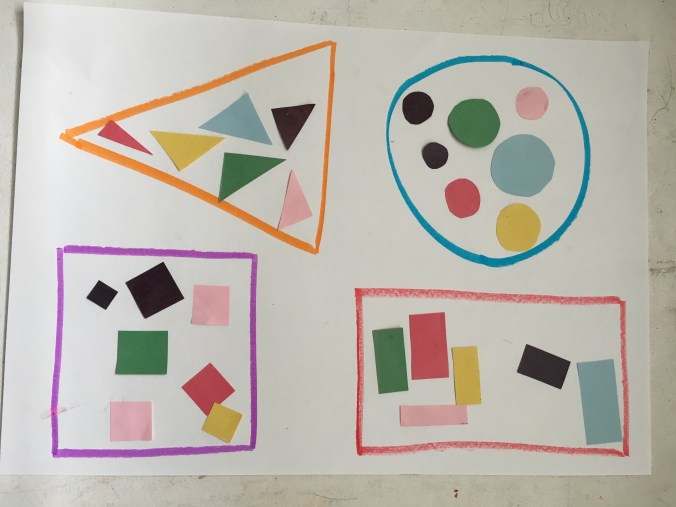
 Viola, shape sorting, complete with their favorite thing – glue sticks! This took me all of five minutes (during nap time) to prep – and I made three of them! 🙂
 I did simple – triangle, square, rectangle, and circle – since my youngest just turned two. Then use construction paper and/or scrap paper to cut out several of each shape. Keep in mind that these need to fit inside the drawn shapes and you likely want them busy for awhile, so cut out enough to keep them occupied.
  They need to be small enough to fit but large enough for little hands. 🙂 That’s it for your prep! The kids will then simply glue each small shape inside the correct large shape. My kids had fun, practiced shapes, worked on their motor skills, had art work to show off at the end, and were occupied while I helped big brother. That’s a win-win, virtually free, and super easy. 🙂